Download
You can sign up for membership in the downloaded ENGAGE app, and an email has been sent to your verified email address.
Email authentication has been completed by checking the email sent to the email you signed up with. You must verify your email within 72 hours.

All progress is connected and enjoy ‘Virtual Saemangeum’ by accessing ENGAGE!

Add ENGAGE capabilities to all major hardware and features, including Windows and macOS computers and Android and iOS mobile devices.
ENGAGE Installation method

|

|

|

|
|
|---|---|---|---|---|
| Operating | Windows 10 or higher | Mojave (minimum), Big Sur (maximum) | Android 7.1.1 or higher | iOS 13.0 |
| Processor | Intel i5 or higher | Intel i5, at least 2.0 GHz and 2 cores or more | Qualcomm Snapdragon 835 or higher | A11 chip or higher (iPhone 8 or higher specification model) |
| Memory | 8GB RAM or more | 8GB RAM or more | 4GB RAM or more | 2GB RAM or more |
| Storage space | 9GB or more available space | 9GB or more available space | 5GB or more storage space | 5GB or more storage space |
| Graphics Card | Nvidia GeForce GTX 970 or higher (for laptops, graphics card is required) | AMD Radeon Pro 560 4GB or higher (requires dedicated graphics card) |
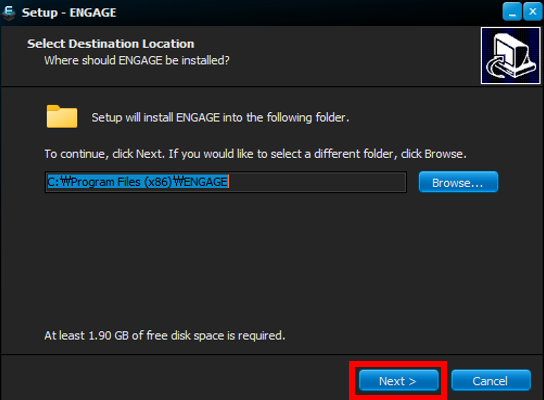
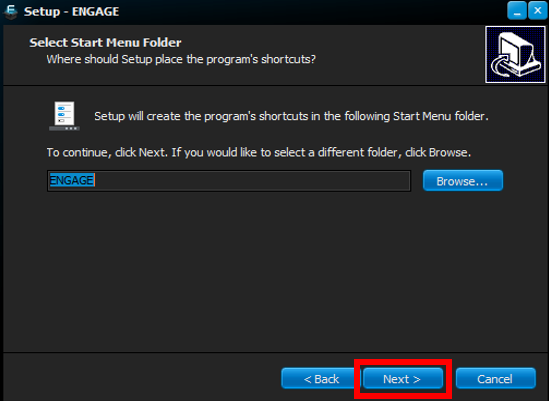
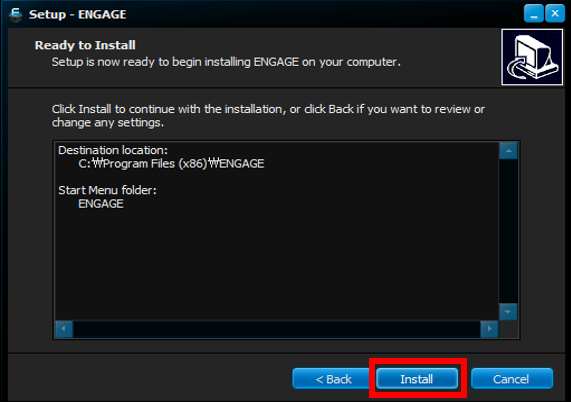
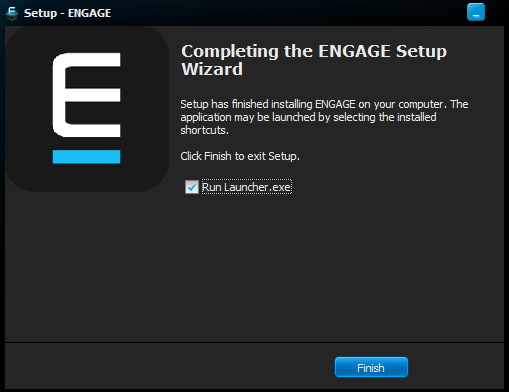
Installation Instructions (PC)
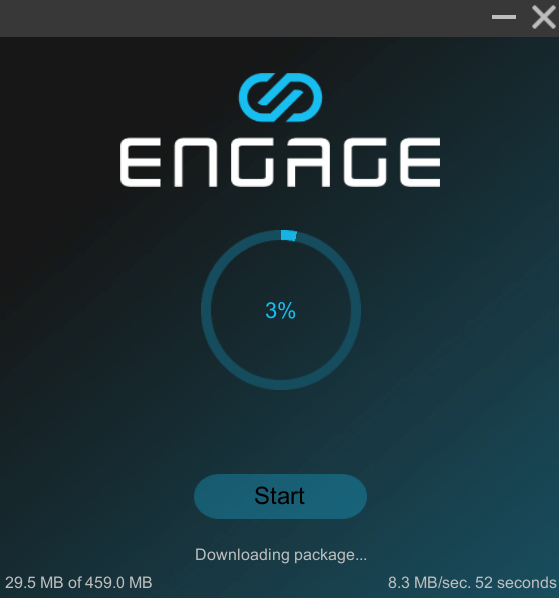
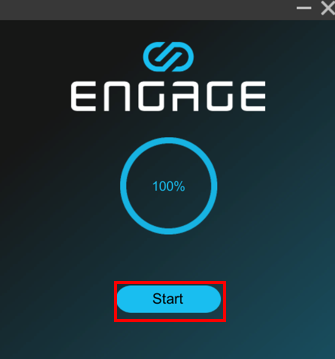
Run the engage file downloaded through the link with administrator privileges.
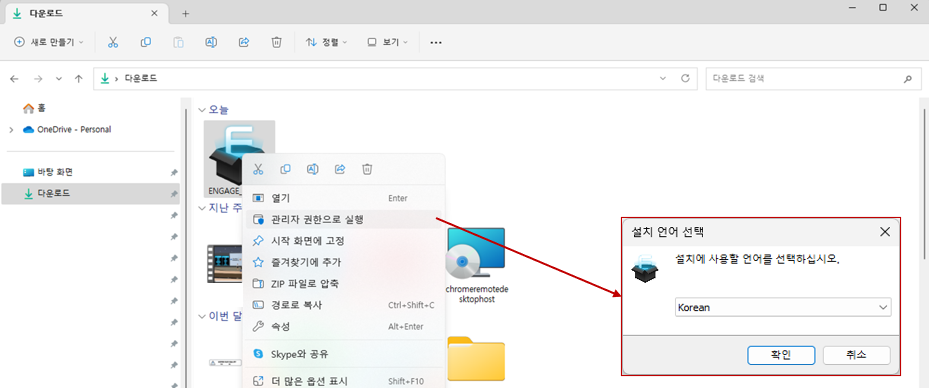
1. Follow the instructions, including selecting the installation location and selecting the Start Menu folder.
2. When installation is complete, click Close.
If you select the executable file, the package will be downloaded. Once all packages have been downloaded, you can press the start button to start ENGAGE.
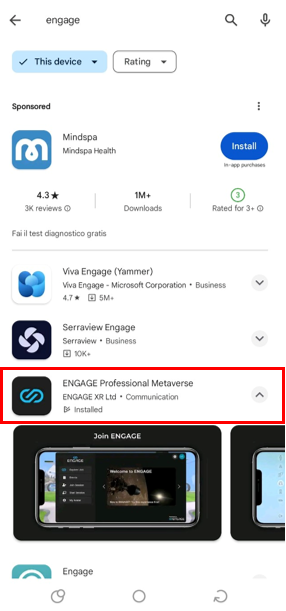
1. Access the Play Store and search for ENGAGE in the search bar.
2. Click ENGAGE and proceed with installation.

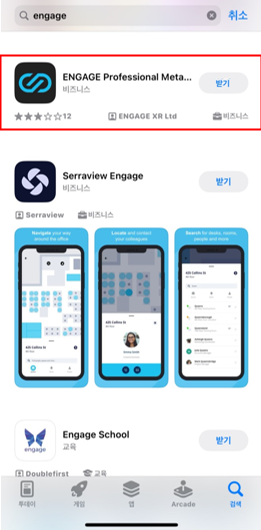
1. Access the App Store and search for ENGAGE in the search bar.
2. Click ENGAGE and select Receive.

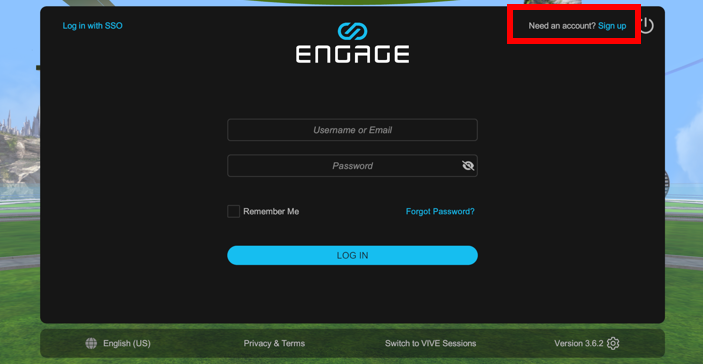
You can create an account on the homepage or ENGAGE app.
[homepage]
1. Go to https://app.engagevr.io/register.
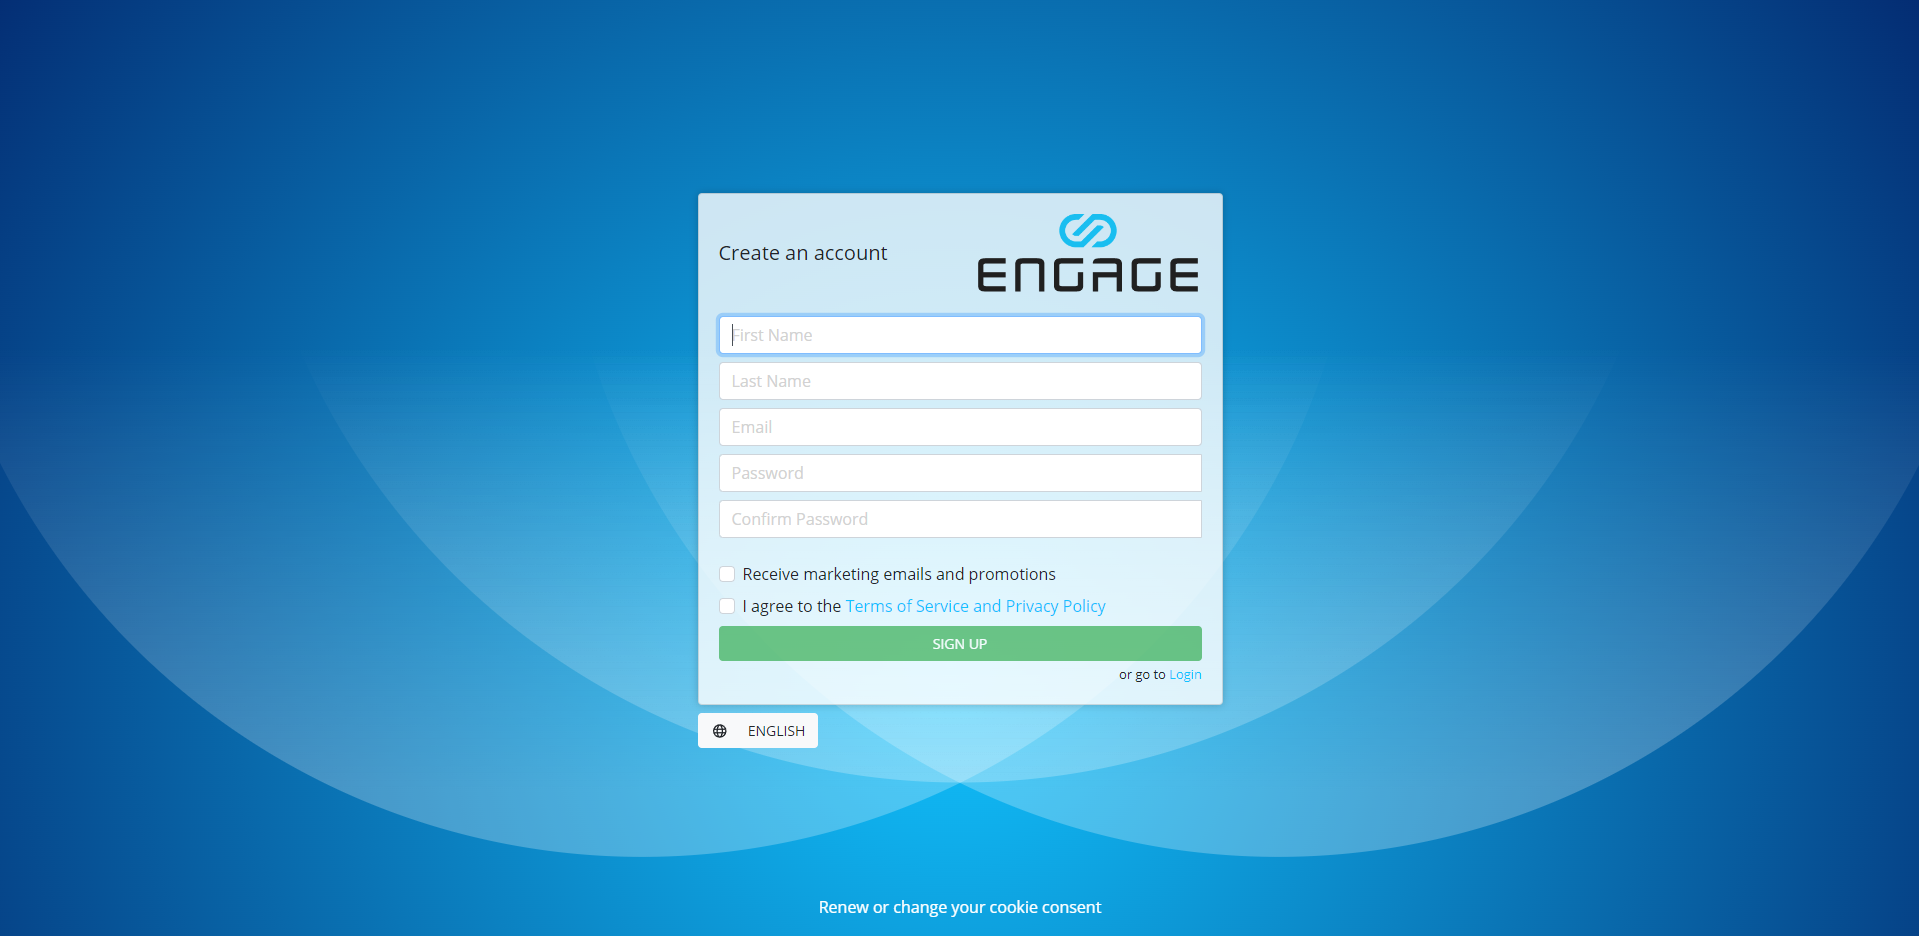
2. Complete the account creation form, review and agree to our Terms of Service and Privacy Policy, then select Sign Up.
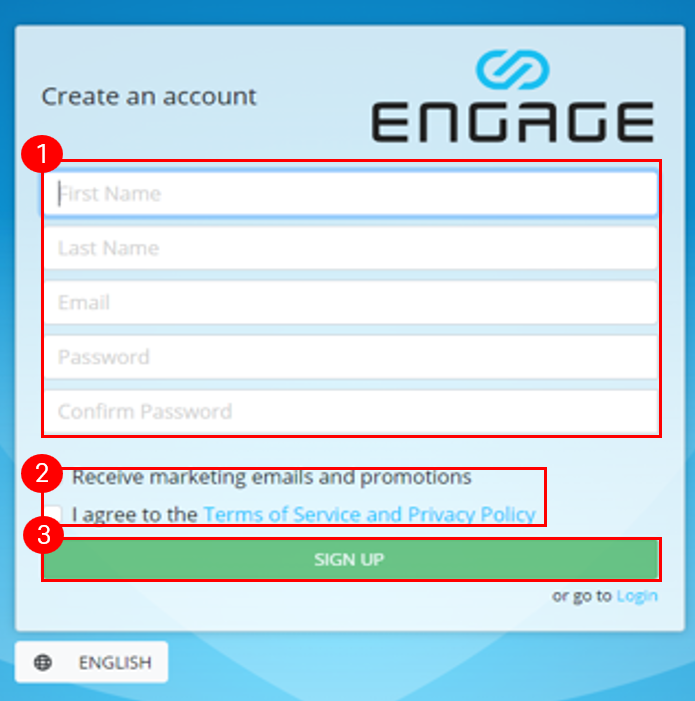
3. Update other profile information on the Edit Profile Details page on the home page.
4. You will receive an email explaining how to verify your email address. You must complete this process within 72 hours.

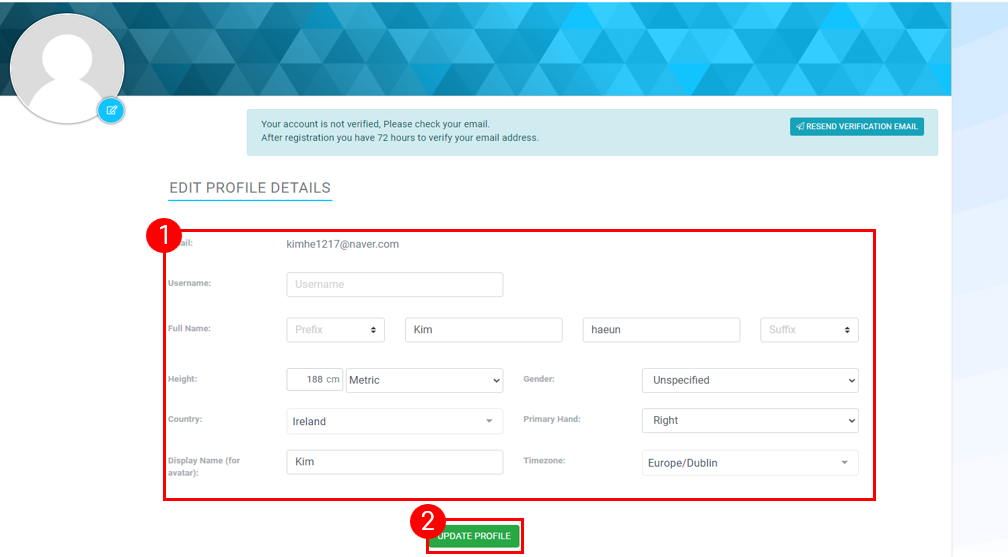
[ENGAGE App]
1. Open the ENGAGE app and select Sign Up in the top right.

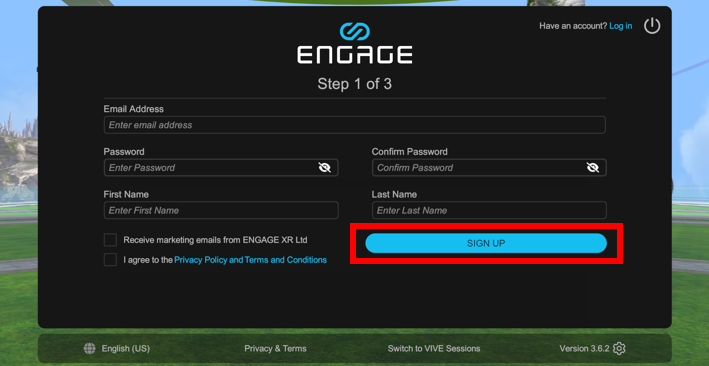
2. On the Step 1 of 3 page, complete the Account Details form, review and agree to the Terms of Service and Privacy Policy, then select Sign Up.
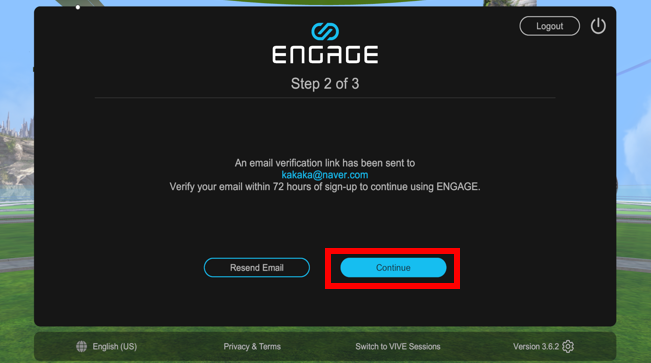
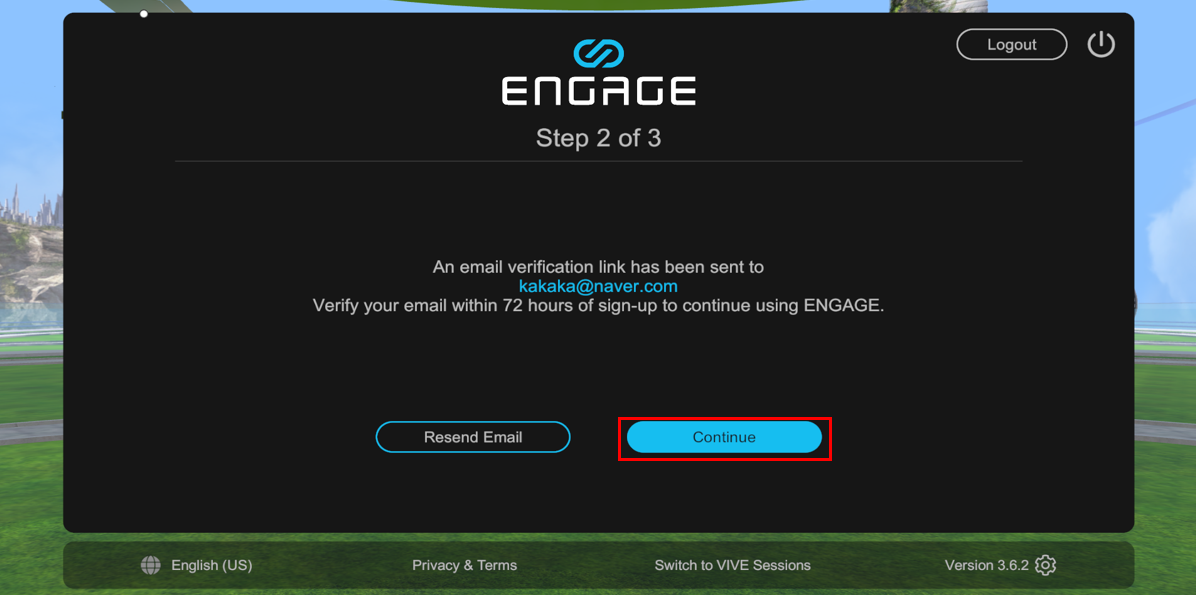
3. Confirm that an email verification link has been sent to the Step 2 of 3 page and select Continue.
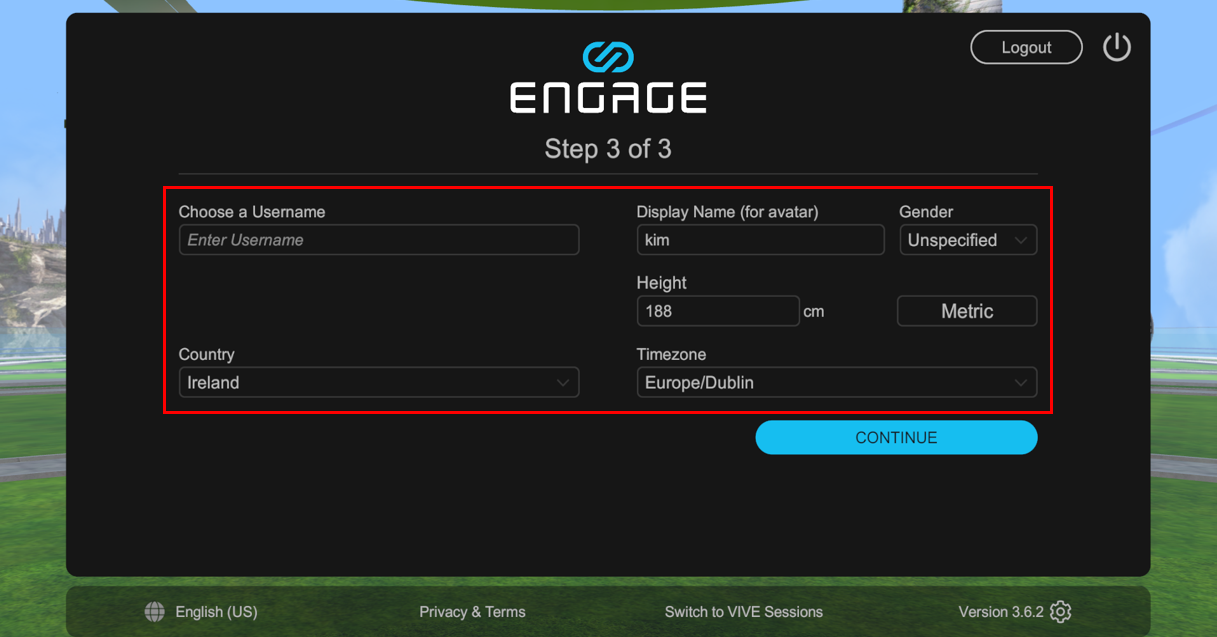
4. On the Step 3 of 3 page, enter your profile information and select Continue.
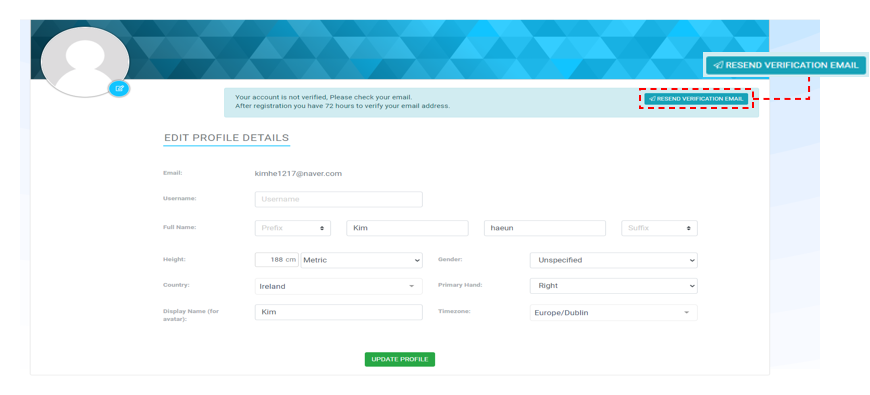
If the email was not sent, select Resend verification email from ENGAGE Web.
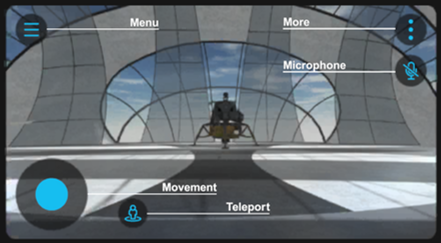
Controls adapt to the device you use.
Windows
Mouse and keyboard controls on desktop devices
Mac
Mouse and keyboard controls on macOS devices
Mobile phones and tablets
Touch controls for Android and iOS phones and tablets
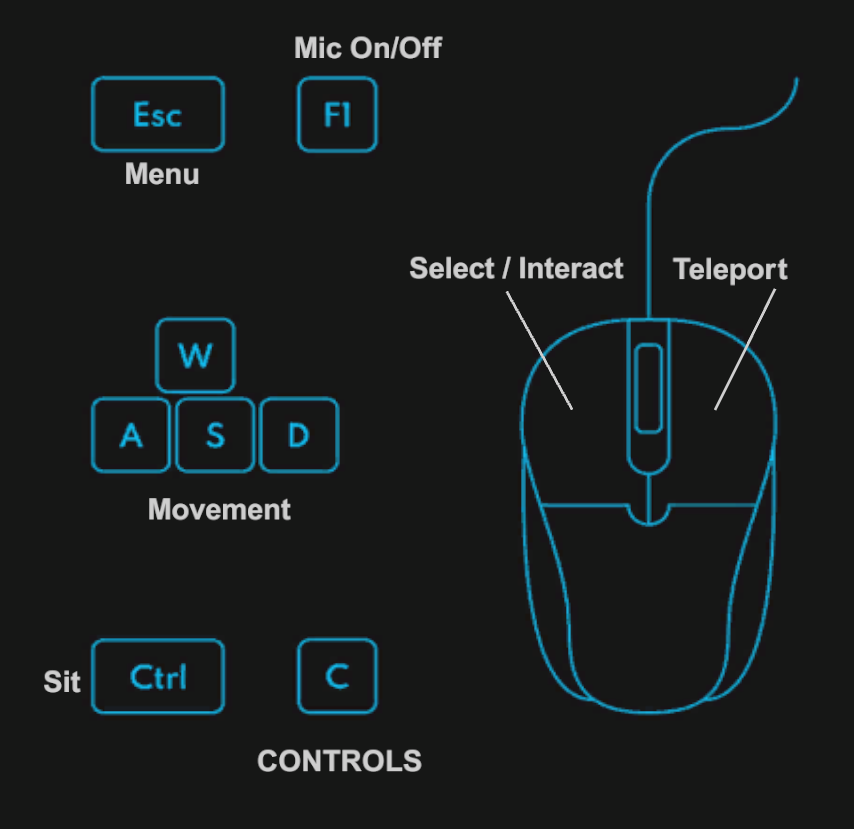
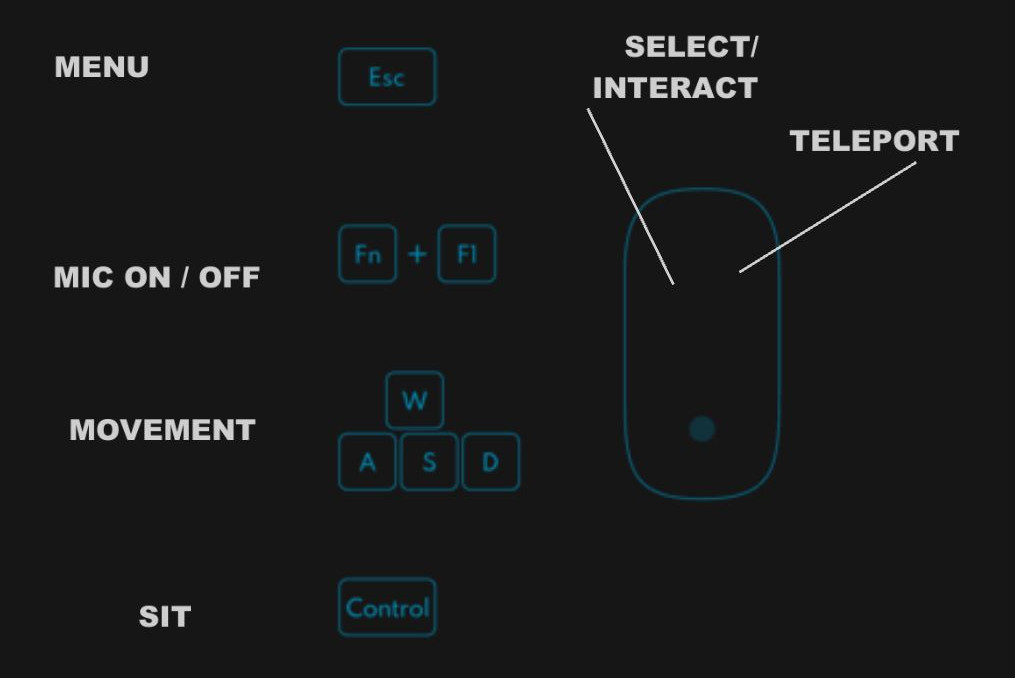
The following keyboard controls are available on Windows and macOS computers.
| Action | Control |
|---|---|
| Go forward in the direction you are facing. | W or up arrow key |
| Move backwards in the direction you are facing | S or down arrow key |
| Slide left | A or left arrow key |
| Slide right | D or right arrow key |
| Move faster | Left Shift + Move key |
| Open and close menu | Esc |
| Mute or unmute microphone | F1 (Windows); Fn + F1 (Mac OS) |
| Quick access to create sticky notes | F2 (Windows); Fn + F2 (Mac OS) |
| Sit on a chair (when near a chair) | Ctrl (Windows); Control (macOS) |
| Increase the size of the IFX when placing or moving it. | + (plus key) |
| Reduce the size of IFX when placing or moving it | - (minus key) |
| Open emoticon panel | F |
| Enable applause gesture | 1 |
| Raise your hand | 2 |
| Activate emoticon | 3 to 8 |
| Toggles whether to display control overlays. | C (Windows only) |
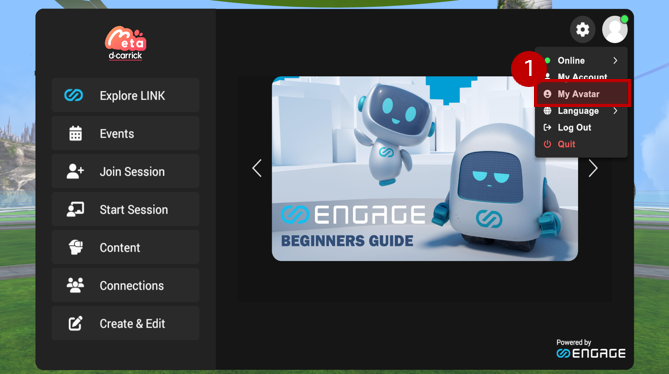
You can use the [My Face] feature of My Avatar to apply a real face image to your avatar.
1. After accessing Engage, click ‘My Avatar’ in the category on the right.
2. Select the [Edit] button.
![2. [편집] 버튼을 선택합니다.](/saemg/images/manual/eng/cm_manual_sec_2_3_img_2.png)
You can select and edit 6 categories.
Body
Select the gender icon to access settings to switch between masculine and feminine body types.
Select the body icon to access facial structure, skin color, and height settings.
Face
Select the facial features icon to access the eye, nose, and lip settings.
Select the hair icon to access the hair and eyebrow settings.
Select the hat icon to choose a hat style and color.
Select the glasses icon to choose between glasses or sunglasses, and select a frame color.
Lipstick and eye shadow. , select the makeup icon to access eyeliner and nail polish settings.
Top
In the tops category, you can choose from a variety of tops and then select a color.
For tops, in addition to the color, you can also select an optional decal. This option adds your company logo at the top. The location, size and number of decals depend on the top type.
Bottoms
The Bottoms category allows you to choose from a variety of bottoms and choose your color.
Costume
The Costume category allows you to choose from a variety of costumes. When you select an outfit, the top, bottom, and shoe settings will be ignored.
Shoes
The shoes category allows you to choose from a variety of shoes and choose their color.
You can use the [My Face] feature of My Avatar to apply a real face image to your avatar.
1. After accessing Engage, click ‘My Avatar’ in the category on the right.
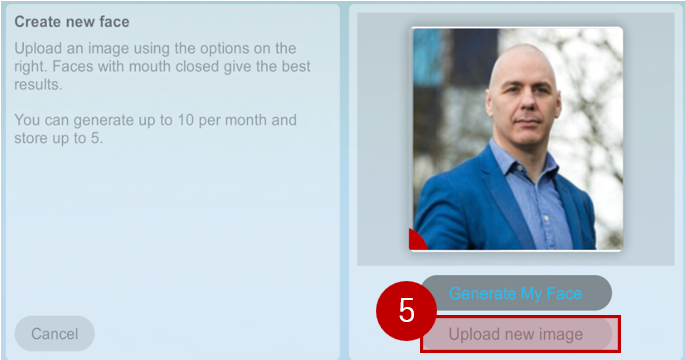
2. Click the [Options] button in the My Face window.

![2. [편집] 버튼을 선택합니다.](/saemg/images/manual/eng/cm_manual_sec_2_4_img_2.png)
3. You can create a 3D face by clicking the Create button in the upper right corner, and you can delete a saved 3D face by clicking the Delete button.
4. You can create a 3D face by uploading an image or pasting a URL.

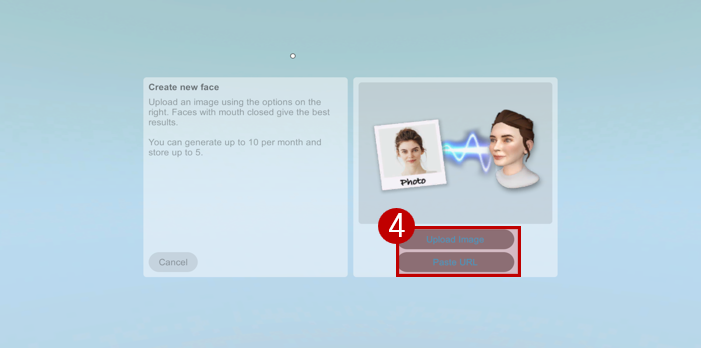
5. Upload the image you want to use as a 3D face and press the ‘Create my face’ button.
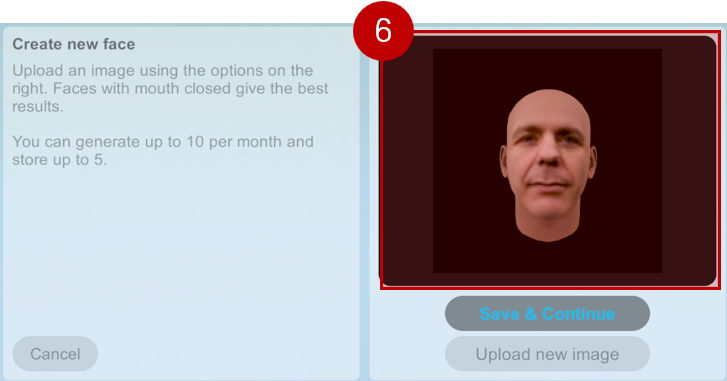
6. After loading, an image with the 3D face applied will appear and if you press the ‘Save and Continue’ button, it will be applied to the avatar face.
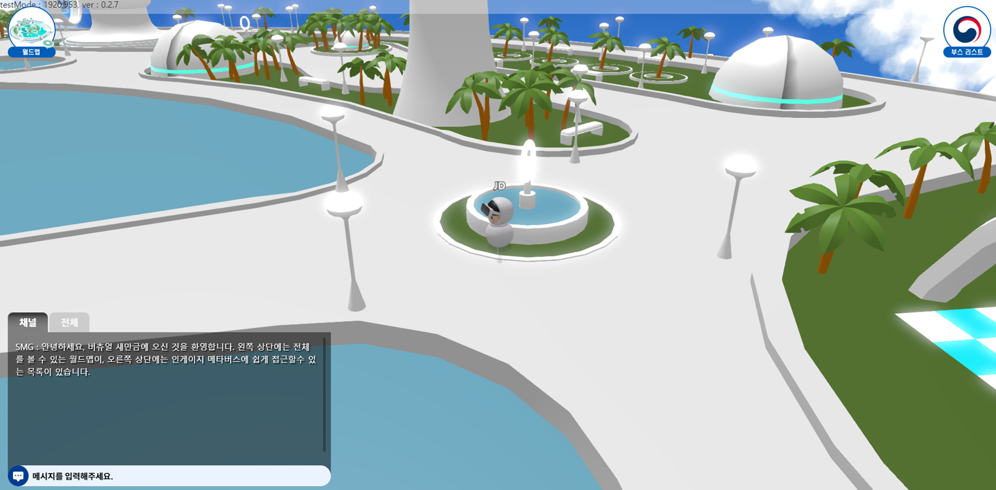
1. https://start.virtualsmg.go.krBy clicking on the link, you can go to the Virtual Saemangeum website.

2. Enter your nickname and click the Enter button.

3. You can move with the left mouse button and rotate the camera viewpoint with the arrow keys.

4. Click on the world map in the upper left corner to view the entire world.

5. Click the message icon at the bottom left to view the chat window. The chat window is divided into the current channel and the overall chat window.

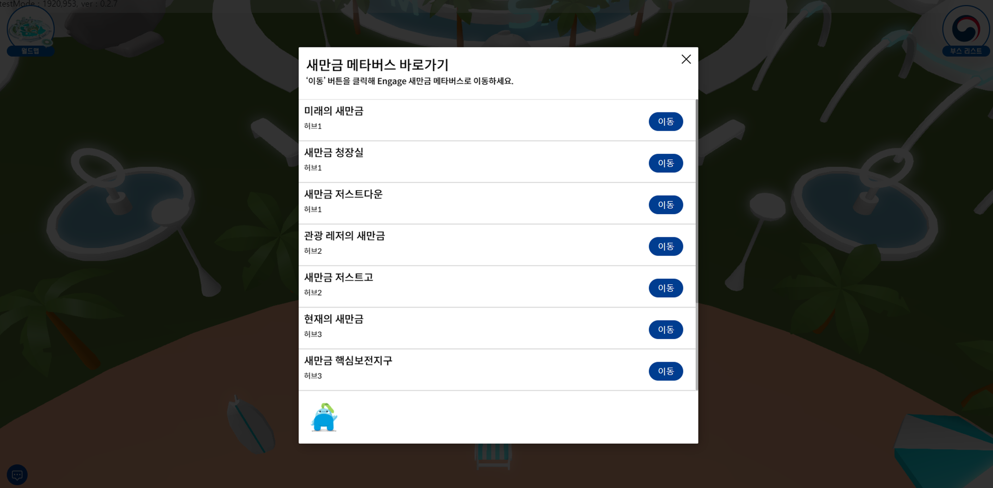
6. If you click on the booth list at the top right, you can see a list of directions to the ENGAGE platform's virtual Saemangeum metaverse space.
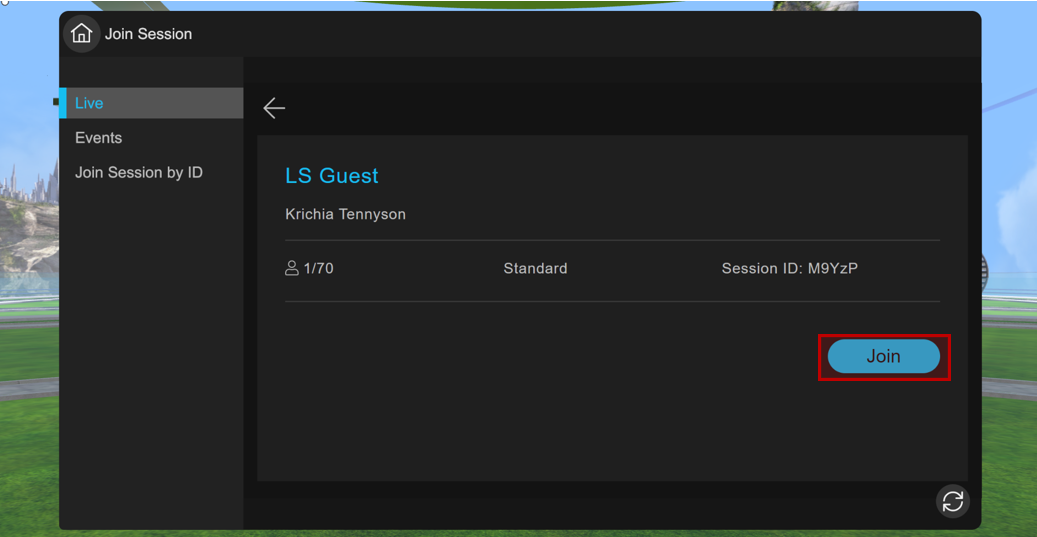
7. Click the Go button to access ENGAGE and participate in the session.
8. After loading, go to the engage session.

9. Click Participate to access the ‘Virtual Saemangeum’ metaverse.
10. Connect to the future Saemangeum and enjoy ‘Virtual Saemangeum’!

Telephone: 063)733-1000
(54004) Saemangeum Development and Investment Agency, 466 Saemangeumbuk-ro, Gunsan-si, Jeollabuk-do
COPYRIGHT ⓒ Saemangeum Development and Investment Agency. ALL RIGHTS RESERVED.